1. Bevezetés
This manual provides detailed instructions for setting up, operating, and maintaining your SAMA V60 Mid Tower PC Case. Please read this guide carefully before beginning your PC build to ensure proper installation and optimal performance.
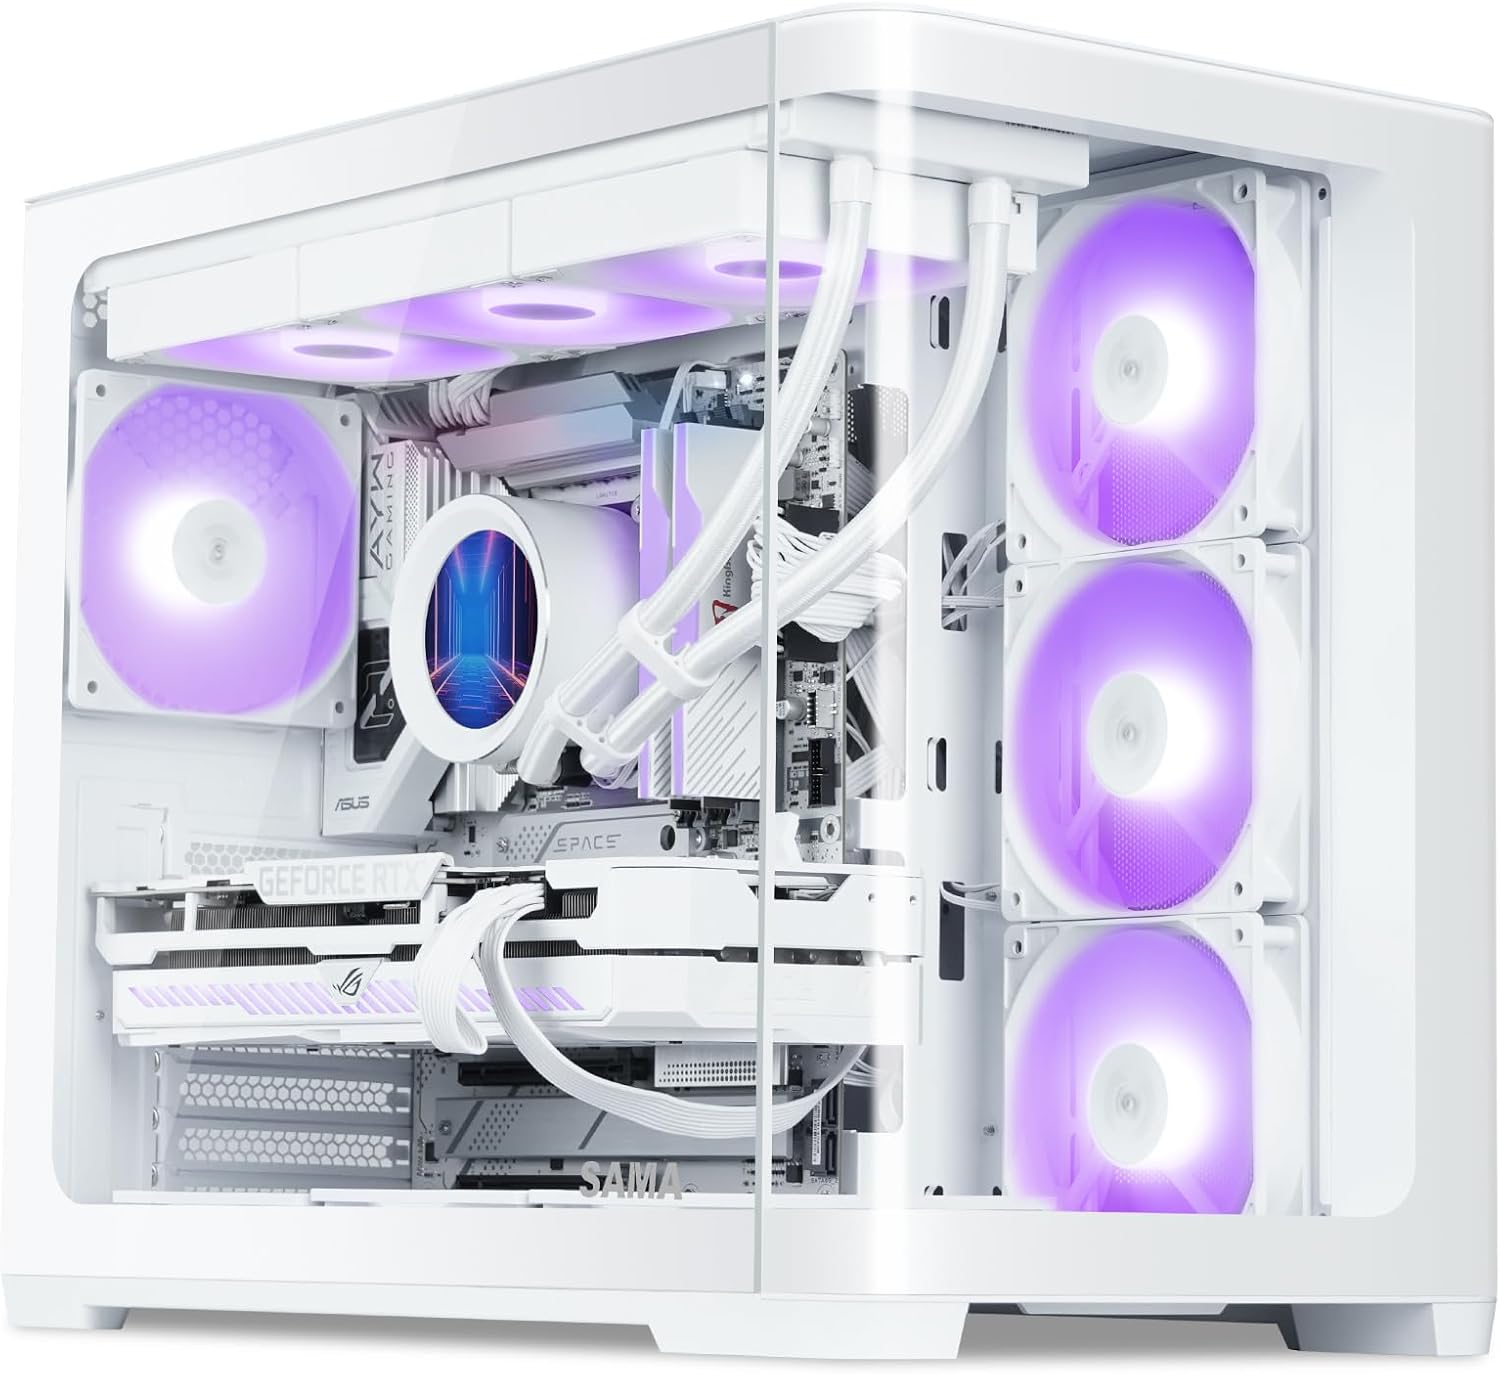
Figure 1: SAMA V60 Mid Tower PC Case showcasing its internal layout and RGB lighting.
2. Termék végeview és Főbb jellemzők
The SAMA V60 is a mid-tower PC case designed for high-performance builds, offering excellent cooling, wide compatibility, and a panoramic aesthetic.
- Exceptional Cooling with 7 ARGB Fans: This case comes pre-installed with seven 120mm ARGB PWM fans (3 bottom intake, 3 side intake, 1 rear exhaust) and includes a fan hub for centralized control. It supports 360mm radiators on the top, bottom, and side for advanced liquid cooling solutions.
- Széleskörű kompatibilitás: Supports ATX, Micro-ATX, ITX, and back-connect motherboards. Offers generous clearance for GPUs up to 445mm, CPU coolers up to 160mm, and PSUs up to 210mm.
- Modern Front I/O: Features a USB 3.1 Type-C port, two USB 3.0 ports, HD audio jacks, and a dedicated ARGB control button for convenient connectivity and lighting management.
- Durable Build with Clean Interior: Constructed from SPCC steel and tempered glass, ensuring durability and a premium feel. Magnetic dust filters are included for easy maintenance, and smart cable routing options simplify installation.
- Panoramic Glass Showcase: Dual tempered glass panels provide an unobstructed view of your components and RGB lighting, ideal for showcasing your build.

Figure 2: The SAMA V60 features dual curved tempered glass panels for a panoramic view.
3. Műszaki adatok
| Funkció | Részlet |
|---|---|
| Márka | SAMA |
| Modell neve | SAMA V60 |
| Ügytípus | Közép-torony |
| Alaplap kompatibilitás | ATX, Micro ATX, Mini ITX |
| Méretek (HxSzxH) | 18.7 x 11.22 x 15.67 hüvelyk (475 x 285 x 398 mm) |
| Tétel súlya | 18.04 font |
| Anyag | SPCC Steel, Tempered Glass |
| GPU hézag | 445 mm-ig |
| CPU hűtő magassága | 160 mm-ig |
| PSU támogatás | Up to 210mm (Bottom Mount) |
| Előre telepített ventilátorok | 7x 120mm ARGB PWM Fans (3 bottom, 3 side, 1 rear) |
| Rajongói támogatás | Up to 10x 120mm fans or 4x 140mm fans |
| Radiátor támogatás | Up to 360mm (Top, Bottom, Side) |
| Drive Bays | 2 db 3.5"-os HDD, 2 db 2.5"-os SSD |
| Elülső I/O | 1x USB 3.1 Type-C, 2x USB 3.0, HD Audio, ARGB Control Button, Power, Reset |
| PCIe Slots | 7 |

Figure 3: Detailed specifications for the SAMA V60 PC Case.
4. Beállítás és telepítés
4.1. Kicsomagolás és első ellenőrzés
Carefully remove the case from its packaging. Inspect for any damage during transit. Retain all packaging materials for future transport or warranty claims.
4.2. Panel eltávolítása
The SAMA V60 features tool-free tempered glass panels. To remove a side panel, gently pull it away from the chassis. The panels are held by a lip and magnets. Exercise caution when handling glass to prevent damage.
4.3. Alaplap beszerelés
The case supports ATX, Micro-ATX, and Mini-ITX motherboards. Ensure standoffs are correctly aligned for your motherboard size. Note that ATX motherboards may sit very close to the bottom of the case, potentially making cable connections challenging. Consider connecting bottom-edge cables before fully securing the motherboard.

Figure 4: Motherboard support layout within the SAMA V60 case.
4.4. Ventilátor és radiátor beszerelése
The SAMA V60 comes with 7 pre-installed 120mm ARGB PWM fans. A fan hub is included to manage these fans. Connect the fan hub to your power supply via a SATA cable. For ARGB control via your motherboard, ensure the fan hub is connected to a compatible 3-pin 5V ARGB header on your motherboard and hold the case's LED button for 5 seconds to switch control.
The case supports up to 360mm radiators on the top, bottom, and side. When installing a radiator on the bottom, be aware that this can make the pump the highest point in the loop, which is generally not recommended for optimal AIO longevity. For easier cable routing to the bottom of an ATX motherboard, it may be beneficial to temporarily remove the pre-installed bottom fans.

Figure 5: Connect the fan control board to your power supply using the provided SATA cable.

Figure 6: Cooling solution options and component clearances.
4.5. GPU and PSU Installation
The case supports GPUs up to 445mm in length. The power supply mounts vertically in the rear, supporting units up to 210mm. The case features 7 PCIe slots for flexible expansion.

Figure 7: Drive capacity and PSU mounting location.
4.6. Meghajtó telepítése
The SAMA V60 provides support for two 3.5" HDDs and two 2.5" SSDs. Refer to the case's internal layout for specific mounting locations, typically behind the motherboard tray and near the bottom fan position.
4.7. Kábelkezelés
The case is designed with ample space behind the motherboard tray and includes Velcro straps to assist with cable routing, promoting a clean and organized build. Pay attention to the front panel connectors; while the case offers modern I/O, careful routing of these small individual cables is essential.
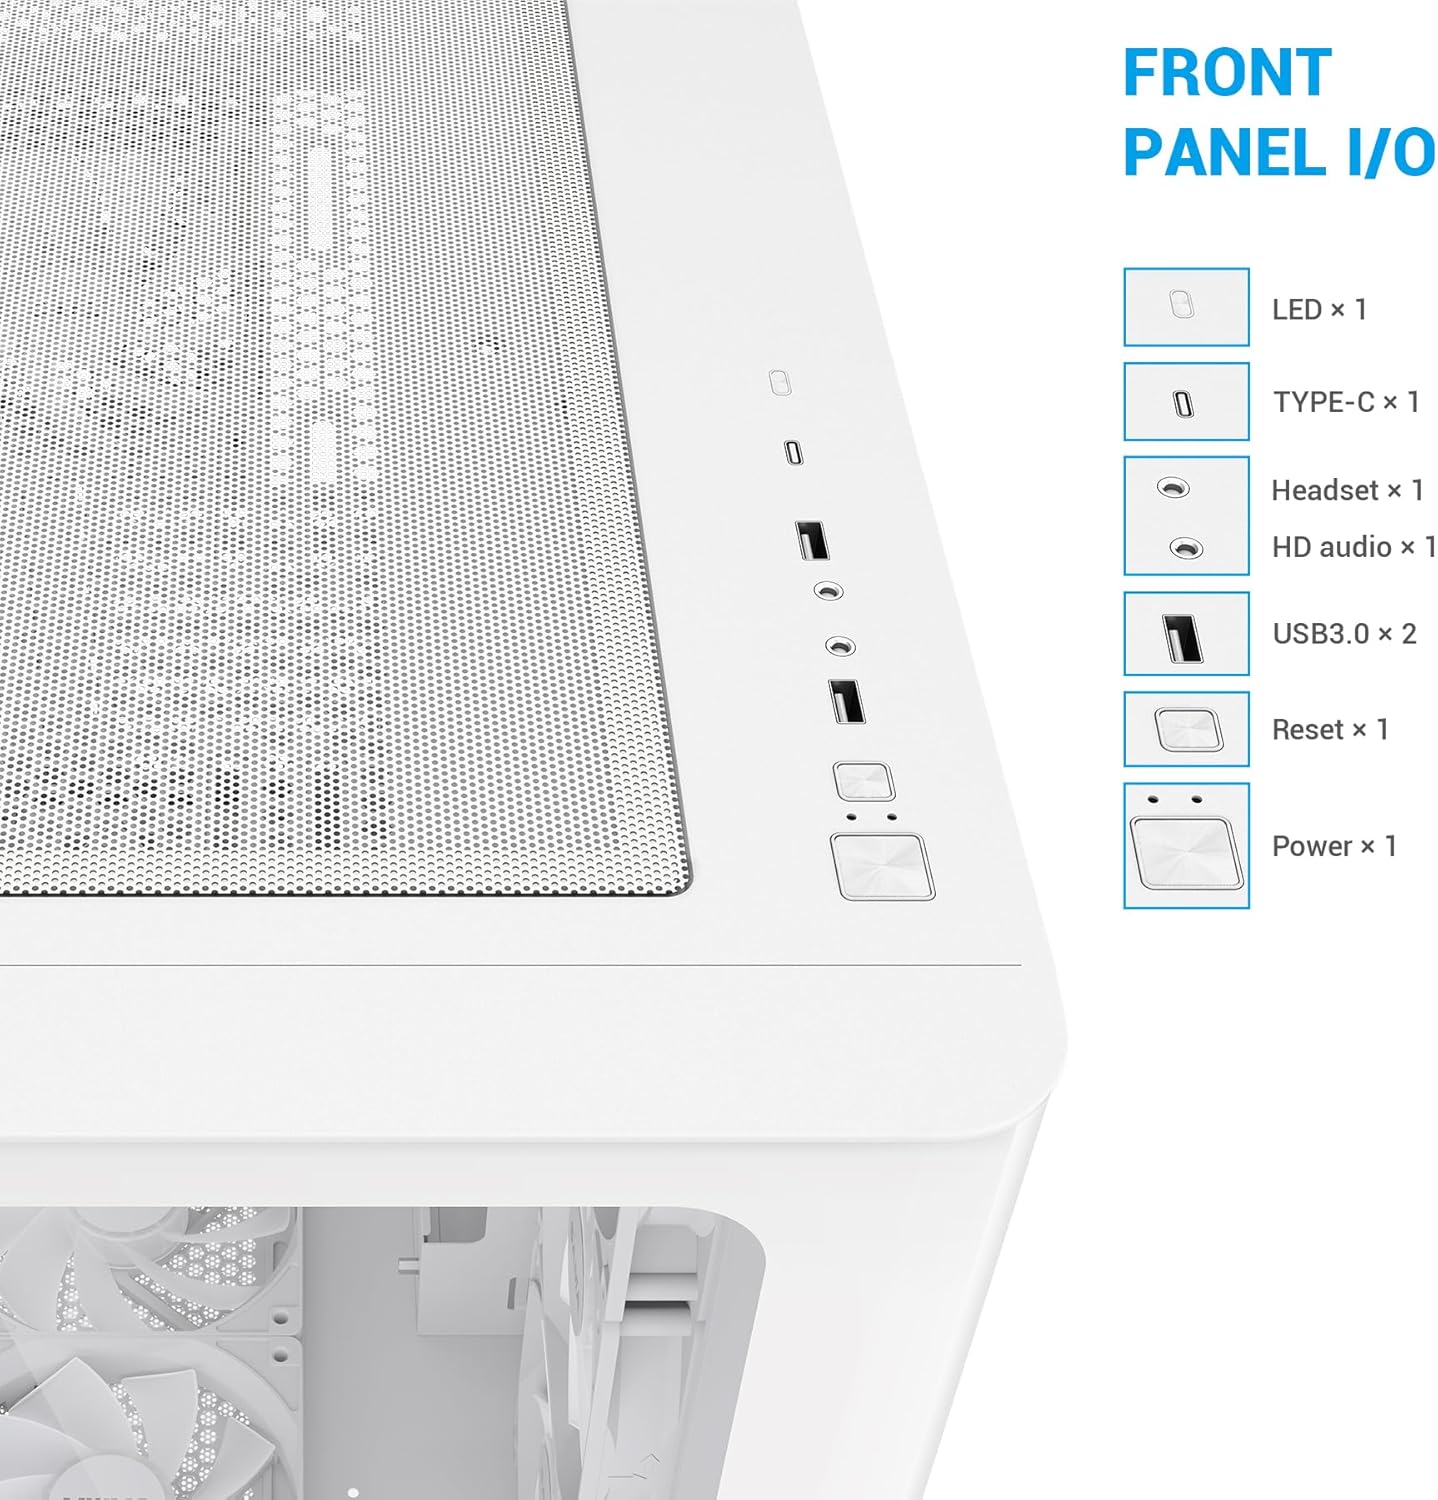
Figure 8: Front Panel I/O ports for convenient access.
5. Használati útmutató
5.1. Be-/kikapcsolás és visszaállítás
Use the dedicated Power button on the front I/O panel to turn your system on or off. The Reset button can be used for system restarts.
5.2. ARGB Fan Control
The pre-installed ARGB fans can be controlled via the dedicated ARGB control button on the front I/O panel. Pressing this button cycles through various lighting effects and colors. To synchronize the fan lighting with your motherboard's RGB software, connect the fan hub to a compatible 3-pin 5V ARGB header on your motherboard and then press and hold the case's ARGB control button for approximately 5 seconds. This will transfer control to your motherboard software.
Video 1: SAMA V60 Chassis multi-angle display, showcasing the case's design and features.
6. Karbantartás
6.1. Porszűrő tisztítása
The SAMA V60 is equipped with magnetic dust filters on the top and bottom. Regularly remove and clean these filters to maintain optimal airflow and prevent dust buildup inside your system. Simply detach the magnetic filters, clean them with water or a soft brush, and reattach once dry.

Figure 9: Magnetic dust filters for easy cleaning.
6.2. Általános takarítás
Use a soft, lint-free cloth to clean the tempered glass panels and exterior surfaces. Avoid abrasive cleaners or solvents that could damage the finish. For internal cleaning, use compressed air to remove dust from components and fan blades.
7. Hibaelhárítás
7.1. Fan/RGB Control Issues
If your ARGB fans are not displaying the correct colors or are not responding to motherboard software:
- Ensure the fan hub is correctly connected to your power supply via the SATA cable.
- Verify that the fan hub is connected to a compatible 3-pin 5V ARGB header on your motherboard.
- Press and hold the dedicated ARGB control button on the case's front I/O panel for 5 seconds to switch control to your motherboard's software.
- Check your motherboard's BIOS settings to ensure PWM fan control is enabled (not DC mode) for fan speed management.
7.2. Cable Routing Challenges with ATX Motherboards
If you encounter difficulty connecting cables to the bottom edge of an ATX motherboard due to limited space:
- Consider connecting these cables before fully securing the motherboard to the standoffs.
- Temporarily remove the bottom pre-installed fans to gain additional access for routing.
8. Garancia és támogatás
For warranty information, technical support, or further assistance, please refer to the official SAMA webweboldalukon, vagy vegye fel a kapcsolatot közvetlenül az ügyfélszolgálatukkal. Őrizze meg a vásárlást igazoló bizonylatot esetleges garanciális igények esetén.


